
What’s the list of steps to follow if you have a question like “How to Check RAM Type in Your Windows 10 And 11?” and how fast is my RAM? How much ram do I have? How to check RAM speed?
You are in the right place. I hope this article will solve all your dilemmas today.
After reading this post, your doubts about how to check RAM type, specs, size, and speed in Windows 10 and 11 will be cleared.
Fortunately, there are many tools and methods for testing your system’s RAM performance. From CMD prompts to system information, checking specs is easier with the new version. There are several ways to find out more about your PC’s RAM, depending on how much information you need.
Knowing your system’s RAM is very important. Because if it’s missing or doesn’t meet the minimum standards, it can cause unwanted problems in your system. So let’s see how to check the type of RAM in Windows 10 or 11.
Table of Contents
How to Check RAM Type in Your Windows 10 And 11 (RAM Type DDR3 or DDR4)
What is RAM?
RAM (random access memory) is incredibly fast memory on your motherboard that temporarily stores files you need to access as quickly as possible. The more RAM you have in your system, the more files you can store while running. This is because you can switch from one application to another to manage more resources and layers.
Also called DIMM (dual channel memory module). This is because it works by storing individual bits in separate memory locations before being loaded into the system. RAM is becoming more popular because it consumes less power than hard drives, CDs, and other older drives.
How to Check RAM type in Windows 10 and 11?
As you know, there are two types of RAM, DRAM (Dynamic RAM) and SRAM (Static RAM). So, to check what type your computer is running, follow these steps:
1. Checking RAM type by Task Manager
If you’re curious about your system’s specs, Task Manager is your one-stop destination. Task Manager is not only limited to information about all the processes running on your computer, it also plays a big role in monitoring the performance and functionality of the hardware and peripherals already installed on your computer.
To check your RAM type, open Task Manager.
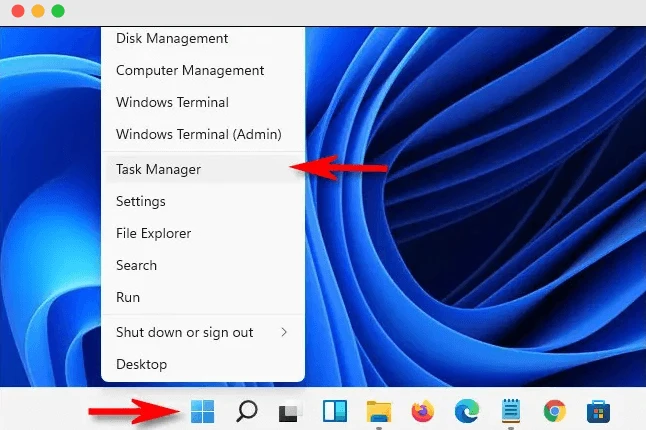
First, right-click the Start button in the lower left corner and select Task Manager from the menu. When Task Manager opens, click the Performance tab at the top and select the Memory option from the sidebar.
You can directly open Task Manager by simply pressing Ctrl + Shift + Esc keys together. If your system uses DDR2, DDR3, or DDR4 RAM, you may see RAM generation in the upper right corner, depending on your device’s make and model.

Or if your RAM speed fluctuates between 2133-3200 MHz, it’s DDR4 RAM. Other speed ranges can be matched in the table below.
So you can check the type of RAM using Task Manager.
2. Checking RAM type through Command Prompt
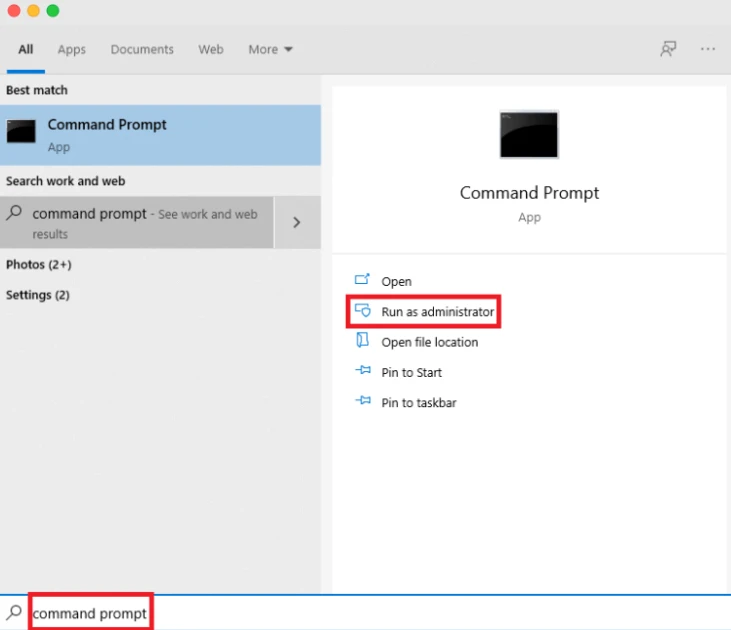
Another way to check your RAM type is to use the command line. First, click the Windows search bar and type Command Prompt. After that, click on the “Run as administrator” option.
After that, you need to enter the command “wmic memorychip get devicelocator, manufacturer, part number, serial number, capacity, speed, memory type, form factor”.
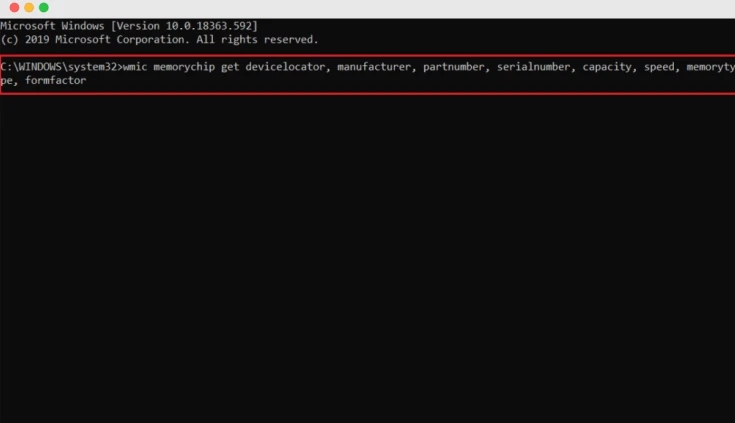
Then you will see a description of the memory type. Pay attention to the numbers displayed. With that output value, you can know some important facts about your RAM such as RAM size, RAM speed, RAM manufacturer, serial number, etc.
Then you can check the type of RAM installed in your computer using the information provided in the table below.
3. Checking the RAM type using Windows PowerShell
Command Prompt has been an important feature for determining the type of RAM, but this is an older method and Windows 10 cannot recognize DDR4 RAM. Therefore, Windows PowerShell may be your best choice. Runs on its own command line. Here’s how to check the RAM type in Windows 10 using Windows PowerShell.
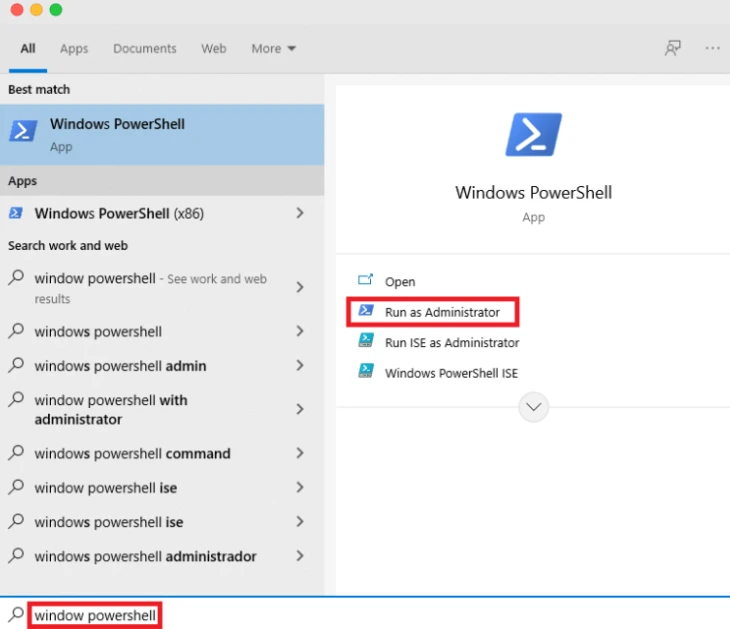
First, press the Windows key on your screen, then enter the Powershell window. Then click “Run as administrator”. Then enter this command:
Get-WmiObject Win32_PhysicalMemory | Select-Object SMBIOSMemoryType and enter
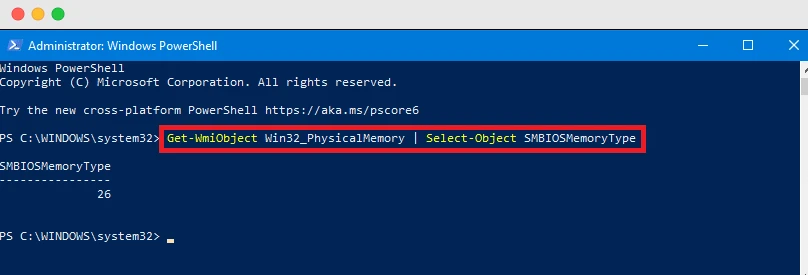
The resulting number that the command displays in the “SMBIOS Memory Type” section should match the column below to determine the type of RAM.
4. Checking RAM through the third-party app
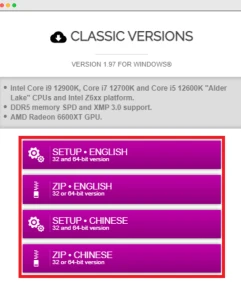
In any case, if the other methods above do not work or you find that they do not work properly, you can use a third-party app to check your RAM type in Windows 10 and 11. This app is called CPU-Z. This is a tool that will ensure that you write down all the features you need and you should be aware of your computer’s hardware and peripherals. Here’s how to check your RAM type if you’re using the CPU-Z tool:
First, open any web browser and open the CPU-Z website. After that, you will have to scroll down the website, select your preferred language in the “Classic Version” section, and decide between a setup file or a ZIP file.
Then click “Download”. Now, if you downloaded a .zip file, extract the downloaded file to the correct folder.
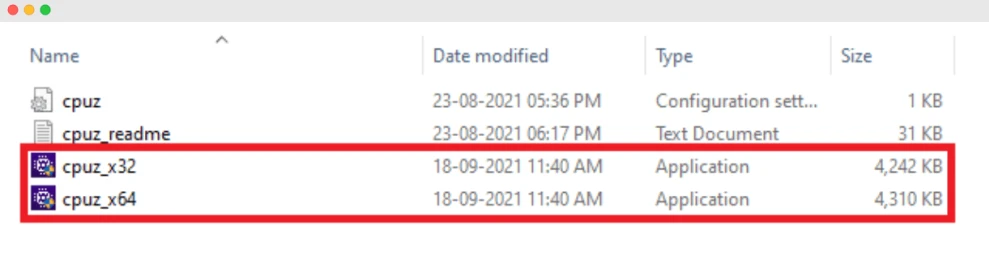
Again, if you downloaded the .exe file, you’ll need to double-click the previously downloaded file and follow the on-screen instructions to properly install CPU-Z.
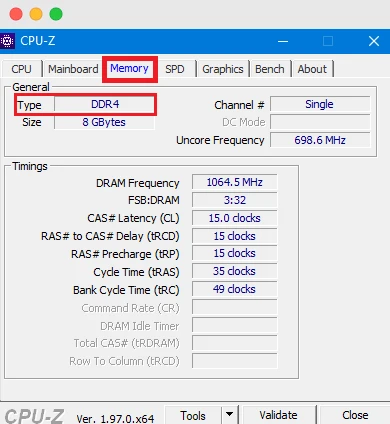
After installing the application, launch the program, go to the Memory tab and find the type of RAM installed in your system in the General section. This way you can check the type of RAM in Windows 10 and 11. If you have any doubts about RAM and its type, feel free to ask in the comments section.
Conclusion
From the above description, we can conclude that there are several ways to check the RAM type in Windows 10. Users are free to use any of the above methods. All methods are very simple and clear.
I tried to give step-by-step instructions for each method so that even beginners can easily check the RAM type in the correct way. So, with the help of this article, I hope everyone knows how to check RAM type in Windows 10 and 11.
If you still have questions or concerns about this topic, feel free to ask us in the comments section below. I will be happy to help you.
- 12 Best Budget Mini PCs in 2022 – Under $1000, $800, $600, & $400

- 7 Best PCs for 4K Gaming in 2022 (High-end, Mid-tier, Budget)
- How to Check Mouse DPI on Windows 10 and 11 [Explained in 2022]
- 8 Best CPU to Pair with RTX 2070 Graphics Card

- Experiencing Stuttering In Games? Here’s How to Fix Shuttering in Games 2022
- How to Move Games from SSD to HDD (Quick Methods #2022)


Recommendation:  In-depth guide on Crypto Mining with the advantages and disadvantages.

10 Best Mining Rig Frames For Crypto Mining Setup In 2022
[Top] 8 Best Risers for Mining with Your GPU in 2022
RTX 3060 Ti Mining Profitability Setup in 2022 For effective Crypto Mining
Best GPU for mining profit 2022 #Ethereum & #Altcoins Mining (with Pros & Cons)
10 Best Mining Frame /Mining Rig frame for Crypto Mining Setup in 2022
6 Best Motherboard for Ethereum Mining 2022 – Comprehensive Review

Recommendation: Monitors to look at;

10 Best Cheap 240hz Gaming Monitors Reviewed By Mr. Wackadoo-Cheapest 240hz Monitors in 2022
7 Best Monitor For Xbox Series X – Fastest Gaming Monitor for Competitive Gamers


Recommendation: Games to look at;

Top 23 Best AA Games You Should Play Right Away| low budget games pc
Top 25 FREE Single Player Games of All Time
TOP 24 Open World Best Games on PC Today, Ranked by Mr. Wackadoo
Dragon Age 4 release date, story, gameplay, and everything else so far
Before the Blood| Announce Trailer| PC debut| Before the Blood Game on Steam— Enter Yes™


Recommendation: RTX graphics card chipset to look at;

Best RTX 3070 Graphics Cards of 2021
Top GPUs-Best Graphics Cards for Gaming in 2021–2022
Best 2022 GeForce RTX 3080 Amazon Graphics Cards, Check Out Today’s Best Deal
Best Gaming Headsets for PS4 and PS5 in 2022 and beyond
List Of Best RGB Keyboards To Buy In 2021 and beyond