If your computer keeps waking from sleep, there may be some settings that you can change to resolve the issue. Here’s How sleep mode for computer works?
Table of content:
- What Is Sleep Mode?
- How to make your PC sleep?
- Actions for sleep mode
- How to Stop Your Computer From Randomly Waking Up From Sleep Mode?
- Find the one that awakened your computer
- Configure regular maintenance for Windows Update
- Find a failed USB device
- Limit Your Network Adapter
- Disable Other Wake Timers
Table of Contents
What Is Sleep Mode?
It consumes very little power, makes your computer boot faster, and quickly returns to where it left off. Windows automatically saves all your work and shuts down your computer when the battery is low, so you don’t have to worry about losing work due to low battery. Use sleep mode when you are away from your computer, such as during a coffee break.
On PCs (especially laptops and tablets), closing the lid or pressing the power button puts the computer to sleep.
1. How to make your PC sleep?
- Open power option:
- In Windows 10, select Start, then select Settings> System> Power & Sleep> Advanced Power Options.
- In Windows 8.1 / Windows RT 8.1, swipe from the edge of the screen and tap Search (or, if you’re using the mouse, point to the upper-right corner of the screen and move the mouse pointer down. , Click Search.), Type power options in the search box, and tap or click Power Options.
- In Windows 7, click the Start icon on the Start button, then click Control Panel> System and Security> Power Options.
2. Perform one of the following actions for sleep mode:
If you are using a desktop, tablet, or laptop computer, select Choose what the power buttons do. Next to When you press the power button, select Sleep, then Save Changes.
If you are only using a laptop, select Choose what closing the lid does. Next to When closing the lid, select Sleep, then Save Changes.
3. When you’re ready to put your computer to sleep, press the power button on your desktop, tablet, or laptop, or close the laptop lid.
On most PCs, you can resume by pressing the power button on your PC. However, not all PCs are created the same. You can wake up by pressing any key on your keyboard, clicking a mouse button, or opening the laptop lid. Check the documentation that came with your computer or visit the manufacturer’s website.
How to Stop Your Computer From Randomly Waking Up From Sleep Mode?
I have two computers in my office that can’t sleep.I Press the sleep button and wait for all fans to stop spinning. At 2am, I wake up to the dazzling lights on the motherboard. If this sounds like a familiar story, there are several ways to diagnose the problem and maintain the condition. The computer is off at night.
Find the one that awakened your computer

Windows knows exactly what you recently started your computer, so the next time you start it unexpectedly, open the Start menu, search for “cmd,” right-click at the command prompt, and then click Select Run as administrator. Type the following command and press Enter: powercfg -lastwake
If you’re lucky, you’ll get a pretty clear answer. For example, the workstation was last booted because the cloud backup software performed a scheduled evening backup. In this case, the search is finished and you can change the settings of this program or uninstall it to fix the problem.
In other cases, it may indicate a particular hardware device, and you can skip to the appropriate section of this article or search Google for more settings that need to be changed on that device.
If this command does not give you useful information, try the following command: powercfg -waketimers
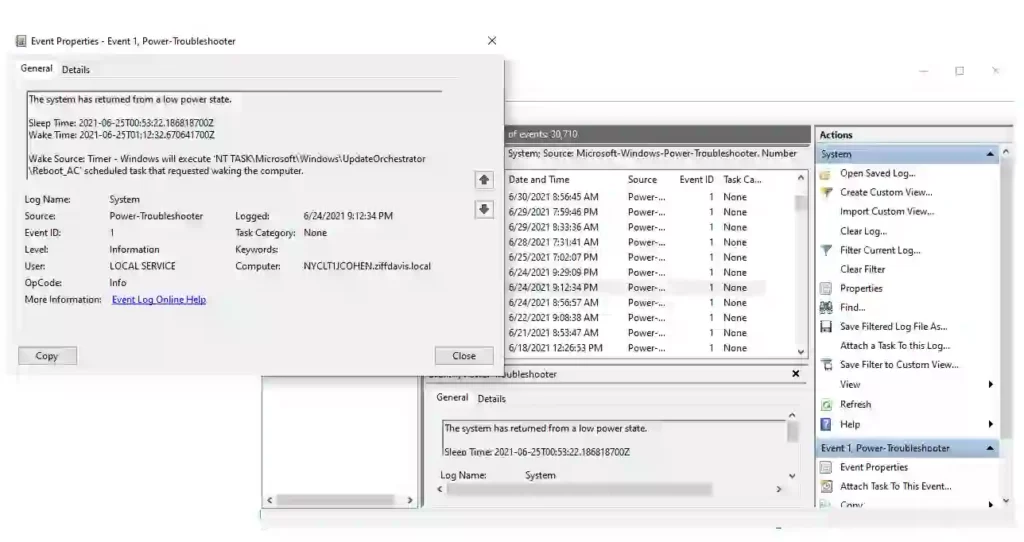
I was also able to find the information in the Windows Event Viewer. Click the Start menu, find Event Viewer, and run the tool. In the sidebar, select Windows Logs> System and click the Filter Current Logs button on the right side of the window.

Select Power Troubleshoot from the Event Source drop-down menu and click OK to see when the computer last started and why. Filtering using Kernel-Power is also useful, but in my experience it is unlikely to contain useful data.
You can use this information to try some of the following solutions to prevent your computer from randomly waking up next time.
Configure regular maintenance for Windows Update
Windows Update is a whimsical beast, and there have been examples of causing many unwanted wakeups in the past. There are several ways to solve this problem.
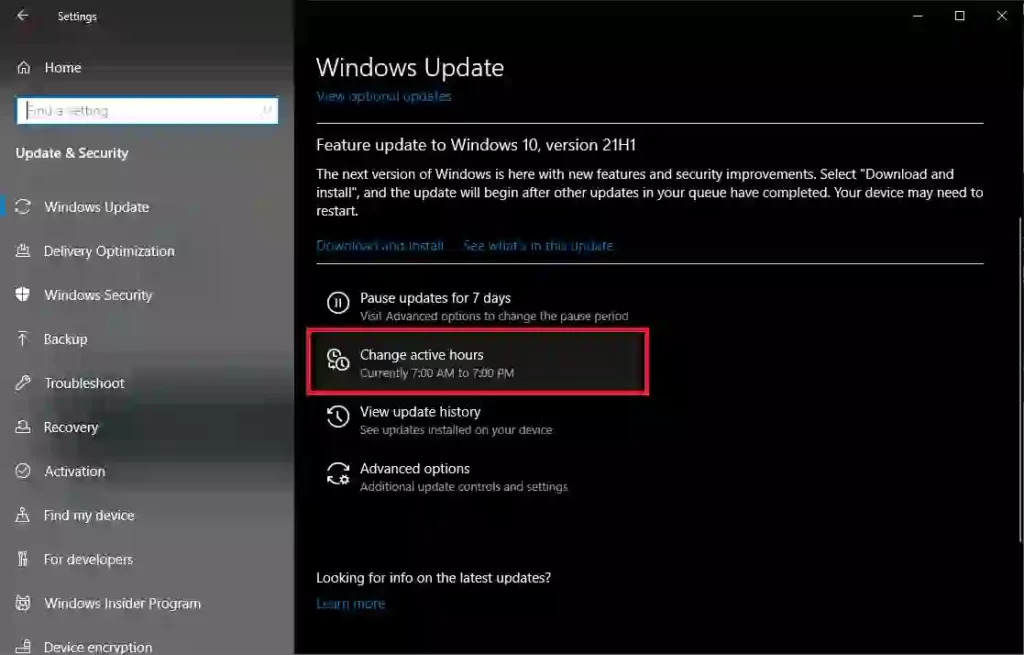
First, try using the built-in Windows Update tool to schedule these updates and restart them more carefully. Set the active and restart times, have time to install the update, and defer the update until you can easily fix this issue. However, to dig a little deeper, you need Windows 10 Pro or later.

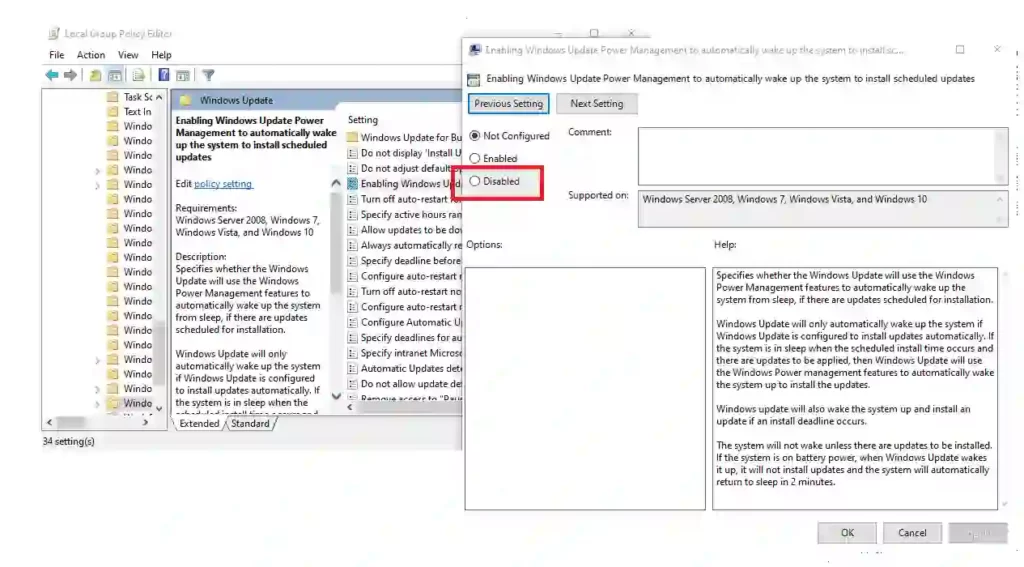
On the correct version of Windows 10, open the Start menu, search for Group Policy, go to Computer Configuration> Administrative Templates> Windows Components> Windows Update, and then go to Power Management. Double-click Update Turn on Windows and set it to Disabled.

Windows also runs a set of automated maintenance tasks once a day, including software updates, security scans, and other tasks. Open the Start menu, search for Scheduled Maintenance, and open the options that appear.
You can change the time of this boot (I set it to start at 5 pm) or clear the checkbox at the bottom to prevent the computer from waking up completely.
Find a failed USB device
If Windows tells you that your USB device is waking your computer, you need to find the faulty device. I would bet money on a donut, it’s your mouse or keyboard-maybe your cat thinks it’s a fun toy when you’re not looking-but it can be anything.

If you’re not sure which device is the problem, unplug all USB devices the next time you put your computer to sleep and see if your computer wakes up automatically. If not, you can leave one device connected the next time you put it to sleep. Continue this until you find the offending device.
If you find the problematic hardware, open the Start menu and search for Device Manager. In the list that appears, find your device, such as your keyboard, and right-click. Select the Properties and Power Management tabs, clear the Allow this device to wake the computer check box, and click OK.
If your computer is booting after doing this, you can also go into the BIOS and disable USB Wake from there when the corresponding option appears. (You can enter the BIOS setup by pressing a key when you first boot your computer. It’s usually like Delete or F2. You’ll usually see this on your boot screen.)
Limit Your Network Adapter
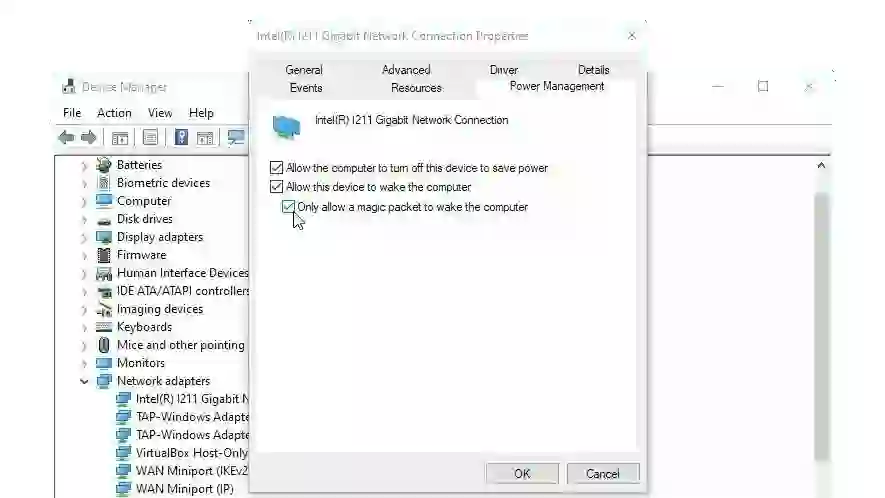
One of the sleepless computers said it would wake up thanks to the Intel (R) I211 Gigabit network connection. This is an ethernet port that connects my computer to the internet. That is, some network activity causes your computer to wake up on a regular basis. This can be fixed in Device Manager.

Open the Start menu, search for Device Manager, and under Network Adapters, find the appropriate Ethernet or Wi-Fi adapter. Right-click on it and select Properties to open the Power Management tab. If you uncheck Allow this device to wake your computer, it will turn gold. You can also find the network wake option in the BIOS as described in the section above.
Alternatively, you can leave this check box selected and select the Allow computer wakeup for magic packets only check box. This is useful if you want to use Wake-On-LAN to remotely access a sleeping computer. This ensures that Wake-On-LAN will continue to work without network traffic waking the computer from sleep. This checkbox is not checked by default for some evil reason. Setting this checkbox completely resolved the issue.
Disable Other Wake Timers
If none of the above resolves the issue, you should look at the wake timer installed on your computer, that is, the scheduled event that allows you to wake up your computer from hibernation. Open the Start menu, search for Change Power Plan, and click Change Advanced Settings in the Change Plan Settings window.
Go to Sleep> Allow Wake Timer and change Battery and Plugins to Disabled. You need to repeat this process for all power plans in the drop-down menu at the top, not just the one you are currently using.
But there is a problem here. This is a wide range of settings designed to affect all wakeup timers. This can mean being too diligent (assuming you have a specific wakeup timer you want to turn on). Moreover, it is strangely inefficient. So if you really want to use the nuclear wake timer, you may not be able to stop everything, but you can still adjust it.

With this in mind, it’s also a good idea to open PowerShell and run the following command:
Get-ScheduledTask | where {$_.settings.waketorun}
This will help you find scheduled tasks designed to wake your PC from sleep. If you find something you want to disable, open the Start menu, search for Task Scheduler, then use the sidebar to navigate to the task you want and double-click to edit it. Select the Conditions tab and clear the Wake the computer for run this task check box.
Random awakenings can be very difficult to resolve and may require further digging to find a particular problem. But I hope the above options at least point you in the right direction.
Note that if this happens again, you may need to go back and do this after a few months. New programs, new hardware, and Windows Update can always cause the problem to recur. It’s a curse, but at least now you can put it under control.
Shop related Product
Recommendation: How-To's & Tips

How To Allocate More Ram To A Game? Windows 10 & 11 Update
How to increase VRAM in Windows 10


Recommendation: Games articles to look at;

Top 23 Best AA Games You Should Play Right Away| low budget games pc
Top 25 FREE Single Player Games of All Time
TOP 24 Open World Best Games on PC Today, Ranked by Mr. Wackadoo
Dragon Age 4 release date, story, gameplay, and everything else so far
Before the Blood| Announce Trailer| PC debut| Before the Blood Game on Steam— Enter Yes™

Recommendation: RTX graphics card chipset to look at;

Best RTX 3070 Graphics Cards of 2021
Top GPUs-Best Graphics Cards for Gaming in 2021–2022
Best 2022 GeForce RTX 3080 Amazon Graphics Cards, Check Out Today’s Best Deal
Best Gaming Headsets for PS4 and PS5 in 2022 and beyond
List Of Best RGB Keyboards To Buy In 2021 and beyond
